
We are the Rangers, the mighty,
mighty Rangers.
We live for danger 'cause we are the Rangers.
Pain is no stranger to a mighty Ranger.
Hoo-wah!
Orienteering Course Files
Last updated 2/16/10
I've updated the course files. The new handout goes sequentially from one step to another. That does give the scout a clue as to whether he's at right station, but it's less confusing. Also, I've put letters on the back map instead of numbers. I liked the idea of plotting all the targets on a numerical grid, but it was confusing to some people. Between the station numbers and whatnot you ended up with too many numbers. I hope that's easier for the scouts to use.
Best of all, I've included an Excel Spreadsheet of the main handout in case you want to modify it to fit your own needs.
I've corrected an error on the course setup files. It had the map exercise labelled as station "C" (same as the first station). If you printed that off before 2/16/10 it's wrong. Sorry about that. Please let me know if you catch any other errors.
All files
Here are all the files for the course in one place. Following this section is an explanation of all of them.Note: For the files that are in pdf format set "page scaling" to "none" when you print them to make sure the templates fit together.)Pace Computer Center WheelPlease e-mail me (at fleany 'at' gmail dot com) if you find something that's not clear. I appreciate any feedback--good or bad. Since I contrived this thing, it makes sense to me. Sometimes I need another set of eyes to let me know where my explanations aren't clear.
Pace Computer Back with instructions
Full Pace Computer blanks, 2 wheels per sheetMain Page of Instructions with map on back
Handout in Excel 2007 format
Handout in Excel 2003 format
jpg of the map for back of handoutTransparency Overlay Key for the Map
Overlay Key with Images
Key, full version front and backPicture of a sample course laid out
Course setup sheets
Materials for each Station
Contact me if you need the old files for some reason. I don't have enough space to store them here.
Overview
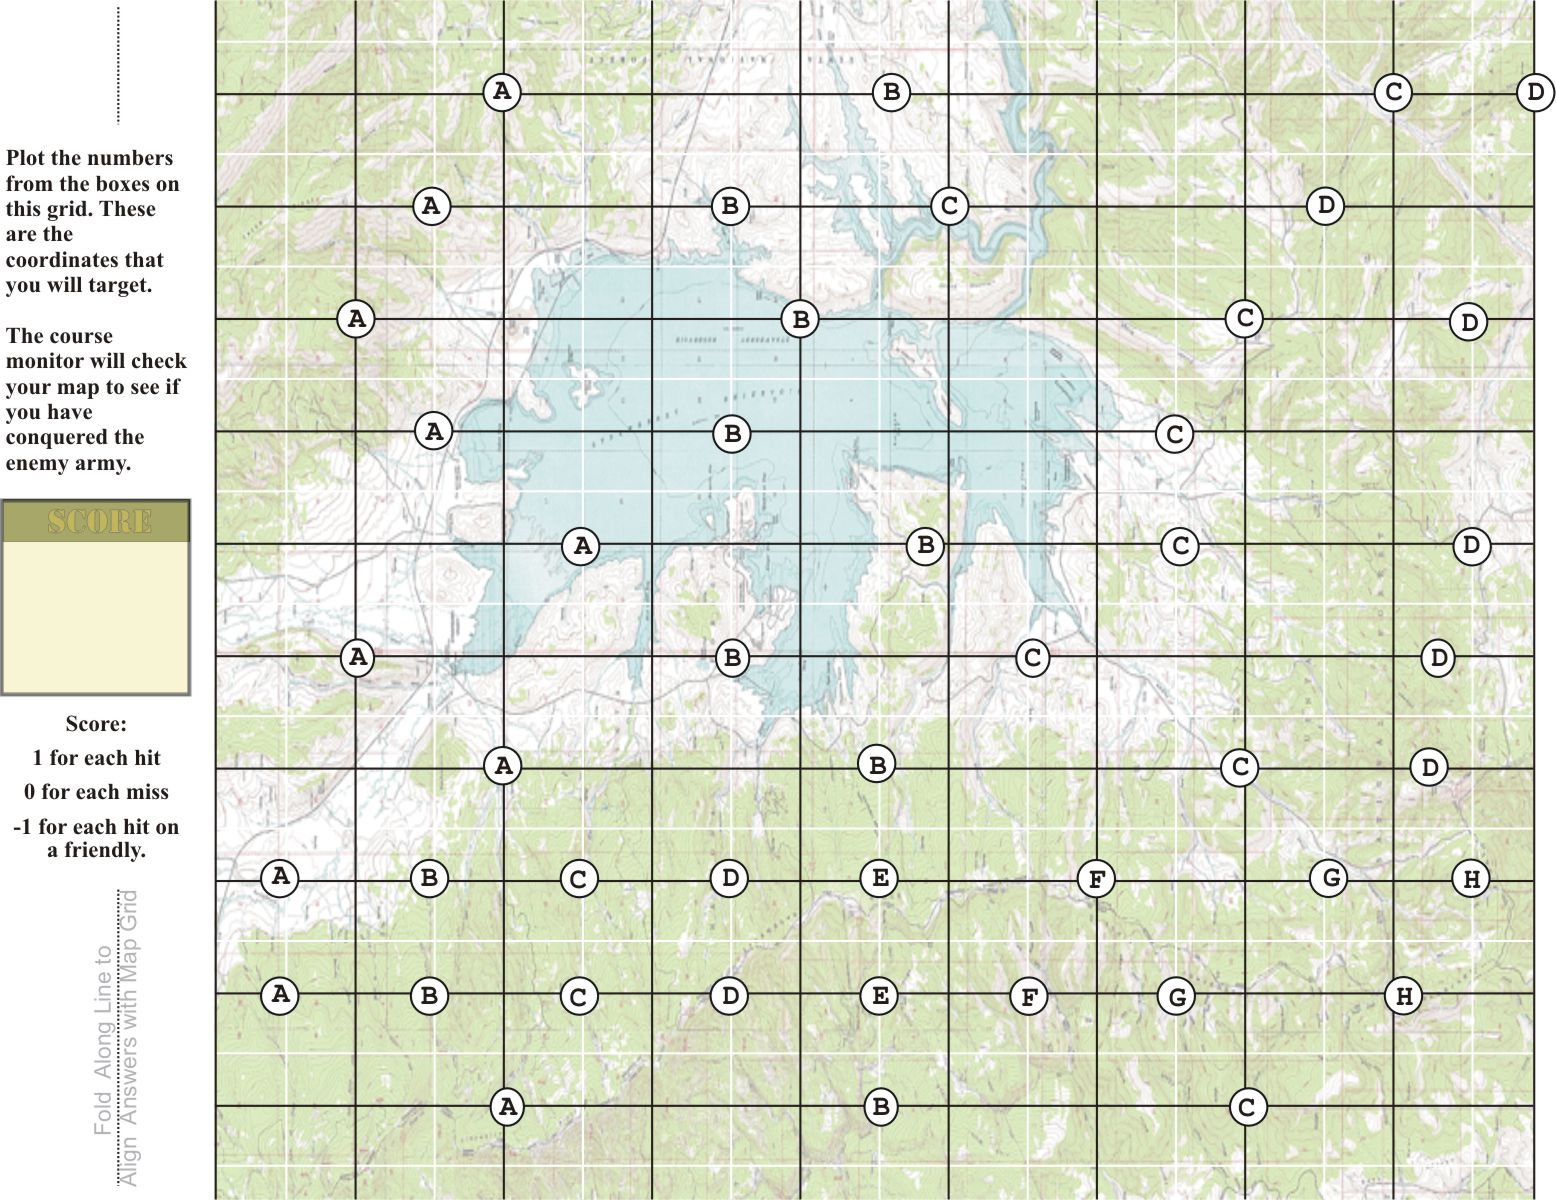
The basic idea of this course is like the game Battleship. The participant is trying to hit specific places on the map and the solutions to various tasks determine where he hits.

The activity starts with a distance measuring exercise and a drill to teach the basics of shooting a bearing. From there the participant navigates to three stations (with two legs each, if desired), answering questions or solving problems at each one. The final target has a reward (candy).
The activity was designed to take about an hour start to finish.
One of the most popular gizmos from this exercise is the pace computer, which is used to measure distances throughout the course.
Pace Computer
The pace computer is a handy device that keeps track of the relationship between your step length and distance. You calibrate it to the number of steps in a fixed distance (say 100 feet) and use it to find the number of steps in any distance.I got the idea from the back of the 1967 Boy Scout Fieldbook. I found the scales at this site. (You can also find them here and here. (If you want you can build yourself a complete Circular Slide Rule that the pace computer is based on.)
Below are the versions that I've put together.
Print out on card stock. There are six wheels to a sheet. Cut out the wheels to attach to the . . .Pace Computer BackPrint out two-sided on card stock. There are two pace computers to each sheet. On the front (of each half page) is the pace computer with basic instructions for use (Complete instructions are below). On the back is a primer for using a compass.Calibrating the Pace ComputerPoke a small hole in the back card and a larger hole (a pen works well for doing this) in the center of the wheel. Attach the wheel to this back using a brad (brass fastener--that's why the hole in the wheel is larger, so it will turn on the flat tangs of the brad).
If you prefer you can print out the Pace Computer blanks together on one sheet without the instructions.
To calibrate the computer walk over a known distance (say 100 feet) with a normal pace that you can duplicate every time. (Scouts tend to walk funny in this part, long strides, silly little short steps . . . they need to use a pace that will be the same every time they walk it.) You will probably want to walk the measured distance a couple or three times and use an average. Make sure the scout doesn't total his steps if he walks it more than once. What he's looking for is the average number of steps it takes to cover that distance (100 feet).
Rotate the inner wheel until the arrow marked "steps" (on the inner--rotating--wheel) is pointing on the outer wheel to the number of steps it took to cover the 100 feet. Make a mark, like an arrow, on the inner wheel opposite the "100" on the outer wheel. Now you have a constant relationship between your steps and the distance they cover.
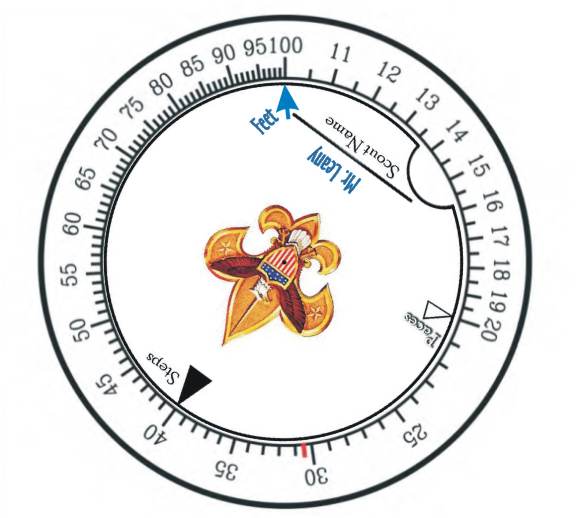
To find the number of steps a certain distance takes, put the "feet" marker that you made next to the distance on the outer wheel. The 'steps' marker points to the number of steps. To pace a distance point the 'steps' marker at how many steps it took and read the distance next to the 'feet' marker that you made.
Add zeros as needed. For example, 110 feet uses the number 11 on the scale. Adjust the steps marker accordingly (1100 feet would be something like 420 steps, not 42).
A pace is just two steps. So one pace would be every time the same foot touches the ground.
The little red line by the 30 on the outer scale is for meters. If you wanted to have a reference for meters you could put your "feet" mark on 100 and make a mark on the inner wheel at the red line (30.48--the number of meters in 100 ft.). This would work for any units you wanted, yard (33/100 ft.) rods, chains, furlongs . . . but now I'm just getting silly.
As long as I'm being silly, you could have one computer for the whole patrol. For the computer to work you only need marks that relate distance to steps. So point the paces arrow to 100, cross out the word "paces" and write in "feet," then each patrol member's step with his name.
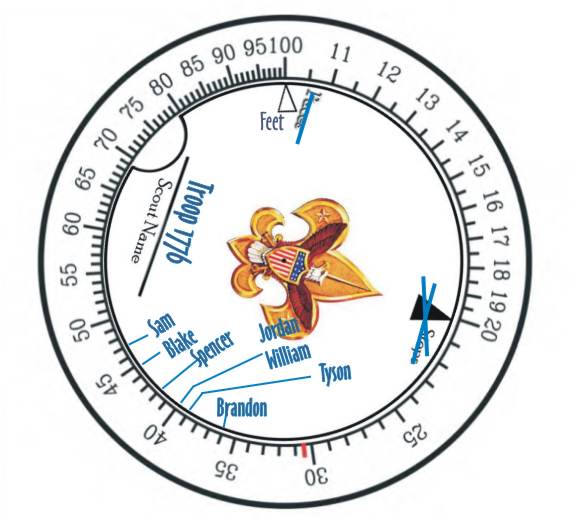
I'm not sure why you would do that, but you could. Maybe it's the one the scoutmaster keeps, because chances are that at the patrol meeting where you need the pace computer at least one scout won't have his.
Map/Instructions
Main Page of Instructions with map on backI also finally got off my can and made a version of the map that you can edit yourself. That way you can, for example, put out whatever candy you want or use whatever scout skill you want instead of what I used on the non-editable pdf. For simplicity you'll probably want to keep the letter for the answer the same for whatever you choose, that way you can use the existing map grid.
Spreadsheet of Handout for Excel 2007Overlay Key for the MapThis file includes the map for the back of the sheet.Excel 2003 (pre-Office 2007 joke/disaster) Spreadsheet of Handout
This only has the instructions. Print the back page from the pdf file above. Or print off this jpg of the map.I print two-sided on regular paper, one copy for each participant. You can just print two pages, if you prefer.
Throughout the course the scouts will write the answers in the boxes on the right-hand side of the front. After they complete the course they will fold those answers back along the line (or just hold the instruction page next to the map page, if you've printed two sheets instead of two-sided). With the boxes for the answers lined up on the map side they will then mark the letters on the map grid.
For example, the first box (firing solution 1) should have "C" in it. The circle with "C" on that line on the map should be filled in. Continue this for every letter down the side. This is the targeting grid. Really it's easier done than said.
Print on transparency film. Lay this over the completed targeting grid to check the solutions. You score 1 point for every hit on an enemy target, 0 for a miss, and subtract 1 for hitting something friendly. This full version of the key shows how a properly completed handout would look.You might prefer to print this fancy version that includes pictures on transparency film instead of the simple version.
Note: The keys rendered to a pdf without a margin, so they aren't exactly the same size as the map. It's close enough (since we are doing bombing targets here), but you may be able to play with the pdf when you print it. I had to jump through some hoops to get the pdf file small enough.
Setting up the course
Click on image to enlarge
I've provided these pages help you set up the course. Carry them around with you when you lay out the stations to write down the bearings and distances. If the course is in a place that you set up beforehand, you can just enter the navigation instructions (bearing and distance) for each station in the spreadsheet before you print it. More often you'll set up the course once you get to the camp, after the materials are already printed. In that case you'll want to make a big poster that has the navigation directions to each station so the scout can copy them onto his handout himself.For the markers I used construction stakes from the hardware store--sharpened stakes about 3 feet long--for the station markers. You can drive them in the ground and write on them or staple signs to them. You'll use a stake for each flag, one for the pin for shooting the bearing and one more for the 100' pace computer calibration course (use the same stake for the bearing shot exercise as the starting point for the 100' course and the start of the orienteering course as well). You'll need one more stake for each station (3) and 3 boxes for the treasures at the end (one for the correct destination and two bogus ones).
For simplicity I make all bearings magnetic.
The principle behind the bearing shot is that any line can be defined by two points; For any given two points there is only one line that will pass through both of them. From the start marker you set up the the two flags so that the red flag is on a bearing line of 312� and the blue is on a bearing of 18� from the stake (see diagram).
Functionally it's easier to set up the flags first, then place the start marker. You plant the red flag. Go 80' on a 60� bearing and plant the blue flag. From the blue flag shoot a bearing of 198� (the back course of 18�). You could get a boy to help you set that up--shoot the bearing from the flag and have him hold the stake along that line (about 100' feet along or so, about where you think the start marker will be).
Do the same thing from the red flag--sight along a bearing of 132� (back course of 312�) and have your helper move along the first line to come in line with your bearing from the red flag. Check back and forth until he's right at the intersection of the two lines--one from the red flag to the 132� (312�) stake and another from the blue flag to the 198� (18�) stake.
If you have three people setting up one person shoots the bearing from the red flag, another from the blue fag, a third person moves the stake until it's right along the sighting from both flags.
On the handout that the boy gets, only one of the indicated markers ("C") is on both of those lines.
Each station has an activity. I used knots, scout law, and map symbols. For the knots I tied three knots on the stake, with a letter next to each one (used a Sharpie marker). The scouts puts the letter of which one he thinks is two half hitches. For the map excercise put the map sheet in a sheet protector attached to the stake.
In the older version I put the activity questions in random order below the station numbers. That was so the scout wouldn't be given a clue as to whether he's at the right station. Now I just have everything in order. The scout starts at the top of the page and works his way down. That prevent confusion in writing down the answers (or forgetting to mark one down at a given station). You can use the decoy stations to trip them up.
With the editable spreadsheet you can use whatever activiities you'd like, for example, "Which of these ankle bandages is tied correctly?"

Material for the stations
Station materials(pdf)
These are the files that the scouts reference at each station. I like to print them on card stock. You might want to put them in a sheet protector for use.Pacing and bearing shot exerciseThe two flags are placed 80 feet apart as shown. They are used to check the calibration of the participant's pace computer. The answer to how far apart they are is firing solution 1.Map Symbols ExerciseThe stake is in location "D." The participant shoots a bearing from that stake to each of the flags to determine which station is the location of that stake.
For example, the scout would stand at the stake and point the compass's course arrow at the blue flag. Then he turns the bezel until the 'N' aligns with the red magnetic needle. From the line going to the course arrow he reads "18�." That tells him that the stake lies along that line, so it has to be C or D.That answer goes in firing solution 2.Now he turns to the red flag and repeats the process, pointing the compass at the flag, turning the bezel to line up with the needle, and reading "285�" on the bezel. The location of the stake has to be at the intersection of those two lines.
Use the map in this file for the map symbols identification activity. The two features they are looking for are contour line (F), and scale (G).Station CardsThese are the cards that go at each station. Notice that the only real stations are A, B, and C. The stations with code D are because you're diabolical and have placed decoy stations in case the poor, unsuspecting scout doesn't bother navigating and just walks to the nearest stake that he sees.
Additional Learning Exercises for Compass Work
Three-legged compass course
Here is an Orienteering Exercise Spreadsheet that I use to get my scouts used to using the compass. It's set up with 15 stakes 10' apart on an East-West line. On the diagram I have fence lines labeled because I happen to have fenceposts in my pasture set at 10' intervals on an east-west line. I just use them.To simplify things you can set out the stakes on a magnetic East-West line. Just set the declination in the spreadsheet to "0." Otherwise the declination is corrected on the spreadsheet so the scout doesn't have to worry about it.
Mark the stakes, starting from the westernmost one, with the character traits of the scout law ("Trustworthy" at the end, "Loyal" at 10', "Helpful" at 20', etc.) and the words "Physically Strong," "Mentally Awake," and "Morally Straight" (130'. 140', 150').
The "Trustworthy" stake is the start point for the 100' pace computer calibration. "Brave" is the 100' mark.
On the "Calculations" tab of the spreadsheet you will enter the start point, end point, and bearing and distance for the first two legs. The spreadsheet is protected so that you can only select cells that you need to enter. (Unprotect the sheet to change the magnetic declination.) The spreadsheet will calculate the final leg. Enter this information for two courses.
You can do that for how ever many participants you have. So for a group of 8 you'd print out two courses, then change the legs, print out two more, until you had 8 courses.
Print out the courses ("Directions" tab) two-sided then cut the sheet in half. For each course you'll have the directions with a primer for using the compass on back.
The scout starts at the stake indicated, follows the directions for bearing and distance, and should end up at a stake. He'll write the name of that stake (trustworthy, loyal, etc.) in the box on his card.
(I say "scouts" and "he" but the best scout I ever had was my daughter. She rocked every scouting skill. This activity obviously isn't just for boy scouts.)
The code number next to that box (where he enters his answer) is the stake he is supposed to end up at. Refer to the handy de-coding list on the "Code" tab to determine if the scout ended up at the right stake.
A variation that I like to use is to put a code word on each stake (instead of the words Trustworthy, Loyal, etc.). I found a padlock at Staples that uses letters instead of numbers. The correct code word opens a treasure box. In that box I put items that they need for their survival kit requirement (emergency poncho, match holder, little flashlight, first aid kit items).
You could do the same thing with a regular combination lock. The entire combination could be on the stake or each scout could get one number of the three needed to open the combination lock.
Here is a two-legged version of the same thing. Note that the page to print out is called "Directions_Printout" on this version.
I hope you have success with this activity. E-mail me with any questions or suggestions.